
There is something particularly frustrating about spending twenty minutes cleaning car windows, stepping back to admire the result, and finding the glass covered in streaks that were not there before. It looks worse in certain light than it did before any cleaning happened at all.
Hazy lines, smear marks, and dried product residue catch the sun at every angle and create glare that is not just annoying — it is a genuine visibility issue, especially at night or when driving into low-angle morning and evening light.
The problem is extremely common, and almost everyone who has tried to clean their own car windows has experienced it. But streaky windows are not an unavoidable outcome of cleaning glass at home.
They are almost always the result of one or more specific, fixable mistakes — the wrong product, the wrong cloth, the wrong technique, or the wrong conditions. Understanding why streaks form in the first place is the key to eliminating them permanently, and the solution requires less effort than most people assume.
This guide walks through the complete process, from setup through the final buff, with an explanation of why each step matters.
Why Car Windows Streak — The Real Causes
Streaks on automotive glass are not random. Every streak has a cause, and once the causes are understood, avoiding them becomes straightforward. The most common culprits fall into four categories: wrong cleaning products, wrong cloths, wrong technique, and wrong conditions.
Product residue is the leading cause of streaks on exterior glass. Most household glass cleaners — including popular brands from the grocery store — contain ammonia, soap additives, or other compounds that leave a thin residue on the glass when they dry.
That residue catches light and appears as a streak or haze. On interior glass, a different type of buildup is responsible. The plastics, vinyl, and foam inside a vehicle cabin release volatile organic compounds (VOCs) as they cure and age — a process called off-gassing.
These compounds drift through the air and settle on interior glass, creating a film that builds up over months and turns into a persistent greasy haze. Standard cleaners often smear this film rather than removing it.
Wrong cloths amplify the problem. Paper towels, old cotton rags, and worn bath towels all leave fibers behind on glass. Some paper towels contain moisturizing agents that transfer directly onto the surface and create a new layer of residue. A cloth that is already damp or dirty from previous use will not absorb the cleaning product from the glass — it will spread it.
Technique is where most people go wrong even when they have good products and clean cloths. Spraying too much product at once causes pooling at the edges.
Wiping in a single direction misses areas where the cleaner has settled. Not doing a dry buff pass after the wet clean leaves the cleaner residue on the glass rather than lifting it away.
Conditions matter more than most people realize. Cleaning glass in direct sunlight causes the cleaning product to evaporate from the surface before the wiping motion can remove it — leaving exactly what evaporation always leaves, which is the concentrated residue of whatever was dissolved in the liquid.
Hot glass on a summer day can cause a cleaner to flash-dry within seconds of application, making streak-free results nearly impossible regardless of technique.
What You Need Before Starting
Gathering the right tools before touching the glass removes the temptation to substitute something that will cause streaks. Here is the practical list:
- At least three to four clean, dry microfiber towels designated only for glass
- An automotive-specific glass cleaner — ammonia-free and tint-safe
- A spray bottle for any DIY solution or for pre-dampening cloths
- Distilled water (for DIY solutions and for a final rinse if needed)
- Isopropyl alcohol at 70% concentration (for interior glass degreasing)
- A detailing brush or soft-bristled toothbrush for edges and seals
- Access to a shaded area — a garage, a carport, or a shaded driveway
The single most important item on this list is the microfiber towel, and it is worth spending a moment on what makes it matter. A quality microfiber towel has a weave structure that physically lifts particles and liquid off the glass surface rather than pushing them around.
The fibers are far finer than cotton and do not leave behind lint or debris. Using a glass-only towel — one that has never touched a wax, a tire dressing, or any other automotive product — eliminates the risk of cross-contamination from residue on the cloth.
Washing microfiber towels without fabric softener keeps the fibers functional — softener coats the fibers and reduces their ability to absorb and lift, which is the opposite of what is needed here.
Step-By-Step: How To Clean Car Windows Without Streaks
Step 1 — Choose The Right Time And Conditions Before Anything Else

The setup before touching the glass is as important as the technique used during cleaning. This is not an optional detail — it is the foundation that determines whether every step that follows works correctly.
Park the vehicle in full shade. A garage is ideal, but a carport, a shaded driveway, or any spot where direct sunlight is not hitting the glass will work. The goal is to keep the glass surface temperature low enough that the cleaning product stays wet long enough to be wiped off rather than evaporating immediately.
On a warm, sunny day, glass in direct sun can reach 140°F or higher, which causes even quality glass cleaners to flash-dry within a few seconds of application — leaving concentrated residue that shows as streaks no matter how fast the wiping is.
Cleaning in the early morning or in the evening naturally helps because ambient temperatures are lower and UV intensity is reduced.
Avoid cleaning glass immediately after the vehicle has been parked in hot conditions. If the car has been sitting in the sun for several hours, the glass retains heat even after moving it to shade.
Give it fifteen to twenty minutes in a cooler environment before beginning. Running the air conditioning for a few minutes with the fan on high can help bring interior glass temperature down faster if working on a warm day.
Step 2 — Clean The Exterior Glass First, Then Move To Interior

Always clean the exterior glass before the interior. Exterior glass has more heavy contamination — road grime, bug splatter, bird droppings, water spots, and brake dust that drifts onto the windows from the wheels — and that contamination can appear on interior glass as glare or as apparent streaks when viewed from inside the vehicle.
Cleaning the exterior first gives a clear reference point for evaluating the interior work. For exterior glass that has heavy bug splatter or water spot buildup, a pre-rinse with water from a hose or a spray bottle removes loose debris before any glass cleaner is applied.
Applying glass cleaner directly to a heavily contaminated surface causes the cleaner to mix with the debris rather than penetrating to the glass itself, which reduces its effectiveness and wastes product. A thirty-second rinse first costs nothing and makes the main cleaning step meaningfully more effective.
Step 3 — Pre-Degrease The Interior Glass For Haze And Film

Interior glass — particularly the windshield — almost always requires a degreasing step before the glass cleaner is applied, and this is the step most DIY cleaning guides skip entirely. The VOC film that comes from dashboard plastics, upholstery, and adhesives builds up over months into a greasy, semi-transparent layer that standard glass cleaners alone do not fully remove.
Applying cleaner over this layer partially dissolves it and spreads it across the glass rather than lifting it, which creates the persistent haze and smear marks that many people find nearly impossible to fully eliminate.
The solution is to wipe the interior glass with a microfiber cloth dampened with 70% isopropyl alcohol before applying any glass cleaner. Alcohol is an effective degreaser that dissolves the VOC film, evaporates cleanly without leaving residue, and prepares the glass surface to respond properly to the glass cleaner in the next step.
Use a fresh microfiber cloth for this — once the alcohol pass is done and the cloth has picked up the film residue, that cloth should not be used again on the glass for any subsequent step. The discoloration on the cloth after the alcohol pass is visible evidence of how much buildup was on the glass before any formal cleaning began.
Step 4 — Apply Glass Cleaner To The Cloth, Not The Glass

This is one of the most consistent technique differences between results that streak and results that do not. Spraying glass cleaner directly onto the glass surface — especially the interior — creates three problems.
On interior glass, over-spray drifts onto the dashboard, upholstery, and electronics, where it can cause damage or staining. On exterior glass, spraying produces an uneven distribution where some areas have too much product and others too little, making consistent wiping difficult.
And on both surfaces, excess product pools at the edges and in the corners, where it is harder to reach with a cloth and where it dries and leaves concentrated residue.
Instead, spray the glass cleaner onto the microfiber cloth until it is evenly damp but not soaked — two to three sprays distributed across the cloth is usually sufficient for one window.
Then apply the cloth to the glass. This approach gives immediate, even contact between the cleaner and the entire glass surface without excess product running to the edges.
Invisible Glass glass stripper is one of the most widely trusted names in automotive glass cleaning for exactly this application. The formula is ammonia-free, residue-free, and designed to cut through the oil-based film that causes interior windshield haze without leaving anything behind when it evaporates.
It is tint-safe at all concentrations, which matters for vehicles with aftermarket or factory tinted glass. The pressurized can version applies a fine, even mist that is well-suited to the cloth-application method described above.
Step 5 — Wipe Using The Two-Direction Method
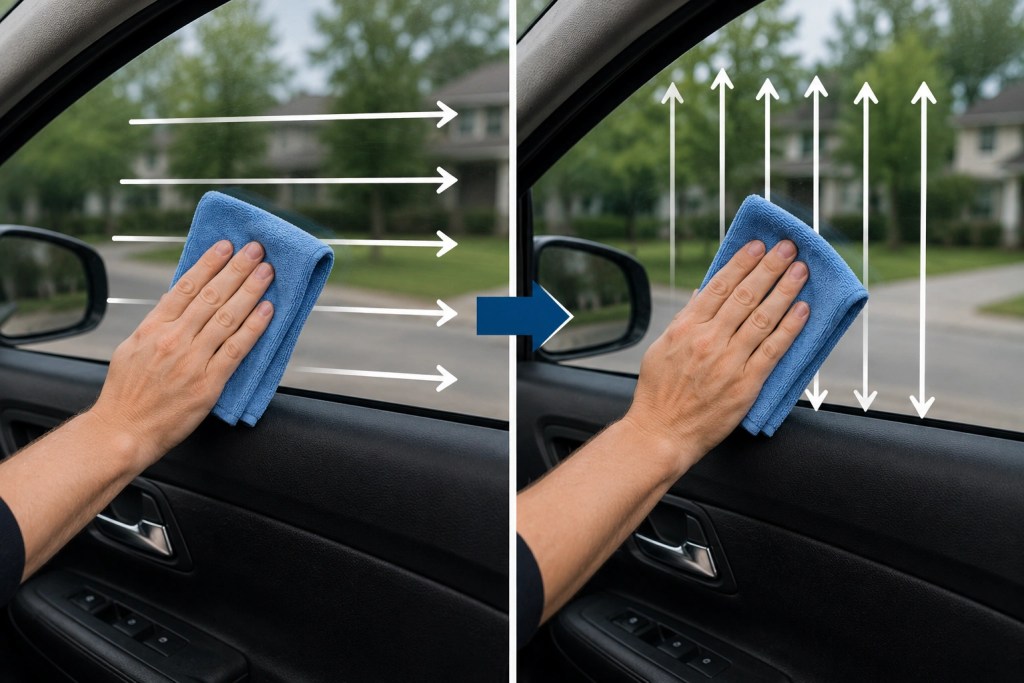
The wiping pattern used after applying the cleaner determines whether streaks appear or not. Wiping in a single direction — always left to right, for example — means any residue the cloth leaves behind runs parallel to the stroke and stays on the glass. The two-direction method eliminates this.
Start with circular overlapping strokes across the full glass surface. This motion ensures every part of the glass receives contact with the cleaning cloth and that the cleaner is worked into any areas where film or residue has settled.
After covering the full surface with circular strokes, follow with straight horizontal strokes from one side of the glass to the other, then finish with straight vertical strokes from top to bottom. This sequence ensures the cleaner is distributed evenly, worked into any stubborn areas, and then oriented in a way that makes any remaining residue easy to spot.
On interior windshields, the angle is awkward, particularly in the lower central section near the dashboard. Sitting in the passenger seat rather than reaching across from the driver’s side gives better arm angle and reach for the full width of the glass.
Tilting the seat back slightly creates clearance between the body and the steering wheel. For the lower corners that are hardest to reach, using the back of the hand rather than the palm — the technique sometimes called the backhand method — provides access to areas that would otherwise require contortion.
Step 6 — Buff With A Completely Dry Second Towel

After the wet clean pass, the glass will look improved but will likely still show some residue from the cleaner itself. This is normal — the purpose of the wet pass is to loosen and suspend contamination, not to fully clear the glass. The dry buff pass is what actually produces the streak-free result, and using a second dedicated dry microfiber towel for this step is essential.
The dry towel should be fresh, clean, and completely dry — not the cloth used for the wet pass. Apply moderate pressure across the glass using the same two-direction pattern as the cleaning step.
The dry towel absorbs and lifts the remaining moisture and suspended residue off the glass surface. If any streaks are visible after the dry buff, fold the towel to expose a fresh, dry section and repeat the pass over that area specifically.
After buffing, cleaning the wiper blades with the damp towel is worth a quick additional step — that surface runs across the windshield exterior repeatedly and carries its own layer of grime that transfers to the glass every time the wipers activate. It takes thirty seconds and prevents the clean windshield from being immediately contaminated the next time it rains.
Step 7 — Clean The Top Edge Of Each Window With The Glass Rolled Down

This is a step that is consistently missed and consistently causes frustration when the windows are rolled up after cleaning. A half-inch strip of glass sits above the window seal when the window is fully closed — the edge that disappears into the door frame.
That strip collects road grime, wiper arm residue, and weatherstrip deposits, and it is invisible when the window is in the closed position. When the window is rolled down the next time, that stripe of contamination slides down onto the freshly cleaned glass and immediately creates a dirty band across the top of the window.
Roll the window down by approximately one inch and clean the exposed top edge of the glass using the same cleaner and a clean section of microfiber cloth. Roll it back up, buff the top edge dry, and then the full window surface — including the part that was previously hidden — is clean. This takes twenty seconds per window and eliminates one of the most reliable post-cleaning frustrations.
Step 8 — Inspect At Multiple Angles And Address Remaining Spots

After completing all windows, the final step is a systematic inspection before closing the vehicle. Glass streaks are angle-dependent — a perfectly clean pane can look streaky when viewed from one angle and clear from another.
The most reliable inspection is to view the glass from inside the vehicle with a light source outside, such as the sky or a light on a building, visible through the glass. Any residue or haze that remains will show clearly against that backlit background.
For exterior glass, crouching to view the surface at a low, oblique angle catches any remaining water spots or residue that an upright view misses.
Any spots identified during inspection can be addressed with a targeted pass using a clean section of dry microfiber rather than repeating the full cleaning process on the entire pane. The two-direction dry buff on just the identified area is usually sufficient to clear isolated remaining marks.
Common Mistakes That Cause Streaks Every Time
Cleaning in direct sunlight or on hot glass. The cleaner evaporates before it can be wiped off, leaving concentrated residue. This is the most common cause of immediate post-cleaning streaks.
Using paper towels. Paper towels have a rough texture that can leave micro-scratches on the glass surface over time and tend to shed fibers which cling to glass and compromise clarity. Microfiber is not optional — it is the correct tool for this job.
Spraying cleaner directly onto interior glass. This causes overspray on electronics and upholstery and produces uneven product distribution that leads to pooling and residue.
Using ammonia-based household cleaners on tinted windows. Even mild ammonia concentrations will permanently streak tinted windows and can degrade the tint film over time, causing peeling, bubbling, or discoloration that cannot be reversed.
Using a single cloth for both the wet pass and the dry buff. A cloth that has absorbed the cleaning product and the contamination lifted from the glass cannot absorb and lift more — it will spread what it has already collected back onto the surface.
Skipping the interior degreasing step. Applying glass cleaner over an undegreased VOC film smears the film rather than removing it, producing haze that is worse than the original contamination.
Using dirty or laundered-with-fabric-softener microfiber towels. Fabric softener coats the microfiber fibers with a waxy compound that turns the towel into a streak-producing tool. Always wash microfiber glass towels without fabric softener or dryer sheets.
Not cleaning the top edge of each window. The hidden strip above the window seal transfers its grime to the freshly cleaned glass the first time the window is lowered, undoing the cleaning in seconds.
When Not To Clean Car Windows At Home
Home cleaning with the steps above works reliably for the vast majority of automotive glass conditions. There are a few situations where a different approach is appropriate.
If the windshield has pitting — tiny craters from gravel or road debris — those pits collect and hold cleaning product residue regardless of technique.
Pitted glass will streak in those areas no matter what is used, because the physics of how liquid sits on a rough surface cannot be overcome with a cloth. Professional glass polishing compound applied with a rotary polisher before cleaning is the appropriate treatment for significant pitting.
Water spots caused by hard water mineral deposits — calcium and magnesium carbonate residue from sprinkler systems or certain car washes — can appear as white or grayish etched circles that do not respond to standard glass cleaners because the minerals have bonded to the glass surface. These require a dedicated water spot remover or a very light application of a compound specifically formulated to dissolve mineral deposits. Standard glass cleaners will not touch them.
If a crack or chip is present in the glass, cleaning around it with standard technique is fine, but any cleaner that enters the crack should be allowed to fully evaporate before driving, as trapped liquid in a crack can expand and potentially worsen the fracture under temperature changes and road vibration.
For significant cracks that affect the structural integrity of the windshield, professional repair or replacement is the appropriate step before any cleaning concern is relevant.
Conclusion
Streak-free car windows come down to four things done consistently: the right conditions, the right products, the right cloths, and the right sequence. Shade and cool glass prevent flash-evaporation. Ammonia-free automotive glass cleaner removes contamination without leaving residue.
Clean, designated microfiber towels lift rather than spread. And the two-step wet-then-dry process, combined with a degreasing pass on interior glass, handles even the most stubborn film without multiple frustrated attempts.
The maintenance side is simple: a light wipe with a clean dry microfiber on interior glass every two to three weeks prevents the VOC film from building to the point where deep cleaning is needed.
For exterior glass, cleaning whenever the wipers are leaving smear marks or visibility feels slightly hazy is a reliable indicator that it is time for a fresh pass.
Keeping a small spray bottle of glass cleaner and two clean microfiber cloths in the vehicle makes it easy to address any window whenever the opportunity presents itself, before contamination builds to a level that requires a full session to address.
Frequently Asked Questions
Why do car windows streak after cleaning even when using a good glass cleaner?
The most common reason is that the cleaning was done in direct sunlight or on warm glass, causing the product to evaporate before it was fully wiped off. Other causes include using a cloth that is already contaminated from previous use, not doing a dry buff pass with a second clean towel after the wet clean, or spraying too much product at once and allowing it to pool at the edges and dry. On interior glass specifically, streaking after cleaning often means the VOC film layer was not removed before the cleaner was applied — the cleaner spread the film rather than eliminating it.
Can household glass cleaners like Windex be used on car windows?
They can, but with a significant caution: most standard household glass cleaners contain ammonia, which is safe for household glass but can damage automotive window tint. On standard untinted glass, ammonia-based cleaners work reasonably well in cool conditions but tend to leave more residue than automotive-specific ammonia-free formulas. For any vehicle with tinted windows — including factory privacy glass in the rear — automotive-specific ammonia-free cleaner is the appropriate choice to avoid degrading the tint film over time.
What is the best cloth for cleaning car windows without streaks?
A clean, dedicated glass microfiber towel is the correct choice for streak-free results. Waffle-weave microfiber designed specifically for glass has a surface texture that provides additional mechanical lift compared to flat-weave options and is less likely to leave lint or fibers behind. The key conditions are that the towel must be clean — free of any wax, dressing, or product from previous use — and must have been washed without fabric softener. Paper towels, cotton rags, and household dish towels are all inferior options that tend to leave fibers and contribute to streaking.
How often should car windows be cleaned?
Exterior windows benefit from cleaning every two to four weeks under typical conditions. In areas with heavy road salt use in winter, near-ocean salt air, or high dust levels, more frequent cleaning is worthwhile both for visibility and for preventing mineral deposits from etching into the glass over time. Interior glass — particularly the windshield — benefits from a light wipe every two to three weeks to prevent the VOC film from building to a visible level, and a full degrease-and-clean session every one to two months depending on how quickly the film accumulates in a given vehicle.
Is it safe to use isopropyl alcohol on tinted car windows?
Standard 70% isopropyl alcohol is generally safe for factory-applied tinted glass, including rear privacy glass, because that tinting is built into the glass itself rather than applied as a film. However, for aftermarket window tint films applied to the inside of the glass, isopropyl alcohol should be used with caution and in diluted form, as concentrated alcohol can potentially affect the adhesive layer of an aftermarket film. The safest approach for vehicles with aftermarket tint is to use an ammonia-free, alcohol-free automotive glass cleaner specifically marked as tint-safe, and to avoid any abrasive or chemical degreaser on those surfaces.
- How To Clean Car Windows Without Streaks: Visual Guide With Images - May 7, 2026
- GM Fuel Pump Wires Color Codes Explained Clearly - May 7, 2026
- Triangle Exclamation Point Car Warning Light Meaning - May 7, 2026


