
Most people learn early on that wheel nuts loosen by turning them to the left. However, this rule is not universal. In some specific vehicles—especially older models, certain trucks, and a few commercial vehicles—wheel nuts are designed with left-hand (reverse) threads.
On these vehicles, wheel nuts loosen clockwise, not counterclockwise. This guide explains when and why wheel nuts loosen clockwise, how to identify reverse-thread wheel nuts safely, and the correct step-by-step method to loosen them without damaging studs or tools.
When Do Wheel Nuts Loosen Clockwise?
Wheel nuts loosen clockwise only when the vehicle uses left-hand threads.
This design was commonly used on:
- Older American vehicles (pre-1970s)
- Some classic cars and trucks
- Certain heavy-duty or commercial vehicles
- Some older Chrysler, Dodge, and Plymouth models
Manufacturers used reverse threads to prevent wheel nuts from loosening due to wheel rotation. Modern cars almost never use this design, but it still exists on older vehicles.
How to Tell If Your Wheel Nuts Are Reverse Thread
Before forcing anything, check for these signs:
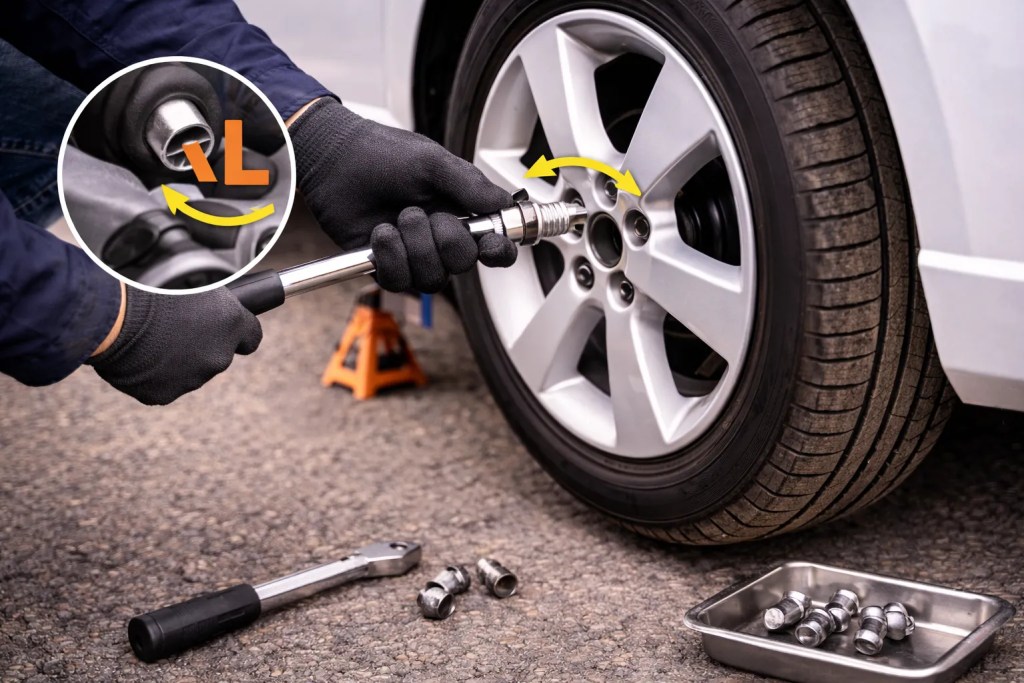
- A “L” or “LH” stamped on the wheel nut or stud
- Arrows indicating clockwise loosening
- Owner’s manual mentions left-hand threads
- One side of the vehicle behaves differently from the other
⚠️ If you’re unsure, do not force the nut. Turning the wrong way can permanently damage the wheel stud.
Direction Rule for Reverse-Thread Wheel Nuts
If your vehicle uses left-hand threads:
👉 Turn the wheel nut clockwise (to the right) to loosen it.
Think of it as the opposite of normal:
- Left = tighten
- Right = loosen
When facing the wheel directly, pushing the wrench to the right loosens the nut.
Step-by-Step Guide
The following steps outline the proper method for loosening wheel nuts clockwise on vehicles with reverse-thread studs.
Step 1: Park and Secure the Vehicle

Before touching the wheel nuts:
- Park on a flat, solid surface
- Engage the parking brake
- Place wheel chocks on the opposite wheels
- Keep the vehicle in gear or park
Stability is critical, especially when applying force clockwise.
Step 2: Break the Wheel Nuts Loose Before Lifting the Car

Always loosen wheel nuts while the tire is still on the ground.
What to do
- Place the wrench firmly on the wheel nut
- Turn clockwise about ¼ turn
- Repeat for all wheel nuts
Why this matters
- The tire’s contact with the ground prevents rotation
- Reduces strain on the jack
- Makes controlled loosening easier
Do not fully remove the nuts yet.
Step 3: Use Proper Leverage for Stuck Clockwise Wheel Nuts

Reverse-thread wheel nuts are often very tight, especially on older vehicles. Using short tools can cause slipping or injury.
A breaker bar provides controlled leverage, which is safer than sudden force.
Recommended tool:
TEKTON 1/2-Inch Drive Breaker Bar
Why it helps here
- Long handle multiplies torque with less effort
- Allows smooth, steady clockwise pressure
- Reduces risk of rounded wheel nuts
- Designed for loosening high-torque fasteners
How to use it
- Attach the correct-size socket
- Position the bar so you can push clockwise
- Apply slow, steady pressure until the nut breaks free
Step 4: Correct Body Position While Turning Clockwise

Proper positioning prevents injuries.
Best technique
- Keep the breaker bar level
- Push using your body weight rather than pulling
- Maintain balance and avoid jerking motions
Never jump or stand on the tool—this can snap studs or cause falls.
Step 5: Loosen Wheel Nuts in a Star (Crisscross) Pattern

Whether loosening clockwise or counterclockwise, the pattern matters.
What to do
- Loosen nuts in a star or crisscross pattern
- Avoid removing them in a circular sequence
Why
- Prevents uneven stress on the wheel
- Reduces binding between wheel and hub
- Makes removal smoother, especially on steel wheels
Step 6: Lift the Vehicle and Remove Wheel Nuts Fully

Once all wheel nuts are cracked loose:
- Jack up the vehicle
- Finish removing the nuts by hand
- Place them in a clean, safe spot
The wheel should now come off without resistance.
Step 7: Reinstalling Reverse-Thread Wheel Nuts Safely
Correct tightening is critical on left-hand thread wheels. A torque wrench ensures proper tightening direction and torque.
Recommended tool:
EPAuto 1/2-Inch Drive Torque Wrench
Why it’s important
- Applies correct torque without over-tightening
- Prevents broken studs and warped components
- Ensures wheel nuts are tightened in the correct (counterclockwise) direction for reverse threads
How to use it
- Thread nuts by hand first
- Tighten in a star pattern
- Set torque to manufacturer specification
- Tighten smoothly until the wrench clicks
Common Mistakes to Avoid
- Assuming all wheel nuts loosen counterclockwise
- Forcing the nut without checking thread direction
- Using impact tools on unknown thread types
- Standing or jumping on the wrench
- Mixing left-hand and right-hand nuts
These mistakes often lead to damaged studs and costly repairs.
Do Modern Cars Loosen Wheel Nuts Clockwise?
Almost never.
- Modern cars use right-hand threads
- Clockwise loosening is mainly found on older or heavy-duty vehicles
- Always confirm before applying force
If there’s no marking or manual reference, assume counterclockwise and proceed cautiously.
Final Thoughts
Loosening wheel nuts clockwise is only correct on vehicles with left-hand threads, but knowing this difference is crucial—especially when working on older cars or trucks.
Identifying thread direction first, using proper leverage, and following the correct loosening pattern prevents damaged studs and unnecessary repairs.
Using basic tools makes the job safer and more precise, even for beginners working on unfamiliar vehicles.
- AC Off Due To High Engine Temp: Causes And Fixes - March 9, 2026
- How Much Is An Oil Change At Valvoline - March 9, 2026
- How Much Brake Fluid Do You Need For A Car - March 9, 2026


